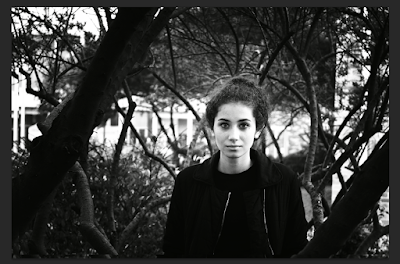
Description of shoot:
For this shoot I mainly used an F stop of 8. This was to get a shallow depth of field which helped create the effect of putting more emphasis on the face of the model which was naturally, the focus. I took photos mainly outside in natural looking locations. I also took some inside certain settings.
I think this worked quite well in some of my pictures as the background got noticeably more blurred then the person. Below is an image I took that I think shows this well:
F stop: 4.2
Shutter speed: 1/60
ISO: 1000
I think her face here is very defined and emphasised as standing out and being separate from the background setting. You can tell that the background is slightly blurred and out of focus. This photo was taken in F 4.2. This is therefore showing a shallow depth of field as the foreground is in focus but the background is slightly blurred.
Image I liked and editing process:
Below is my favourite picture that I took. I really like how she is in a dead pan view and she is looking straight into the camera. I think this draws our attention straight onto her. I also like how she is placed in the background of trees and branches, I think this makes a nice effect. I used multiple processes on photoshop to edit the levels and curves of the picture.
This is the original picture. I took it in F stop 22. This made the whole image in focus and there was no focus point. I did this because I quite liked the effect that the trees in the picture. To put more emphasis on her face, I did the vignette which I have explained below.
This picture shows a screenshot from photoshop with includes all the different layers which include the different effects and edits I put on the picture. I slightly sharpened a copy of the layer and I sharpened the eyes. This was because I think the eyes are a crucial factor of portraiture as they draw a lot of attention and they capture our attention aswell. So especially considering this picture is in dead pan and she is looking straight at the picture, I felt it was important to focus her eyes to draw in even more definition and emphasis.
This is a screenshot of the effects that these layers have put on the picture.
To draw even more definition to her face I added a vignette process on the picture which darkened the edges of the picture so in this case I darkened the whole image using the curves tool. I then highlighted her face by applying the vignette only to her face. This made her fact seem very defined as it made it stand out more which I think is important to separate her from her background as this is portraiture.
This is the final outcome.
Progression and image I disliked:
I didn't like this picture as the focus wrong as it was on the background instead of on her face. I think this doesn't work, especially in portraiture as the face is the most important part and she her face isn't defined or emphasised. Also the flash was on and I think this made her face too highlighted considering she wasn't in focus.
If I had a chance to improve this shoot I would vary my use of backgrounds more to get some interesting and unique settings. I think even though I did get a variety of backgrounds, some of them are quite similar or have similar ideas.
Inspiring images from the internet:
This image is from Alec Soth and I think it is a good example of a portrait picture that is in dead pan and has a vignette on it to make the face more highlighted to capture our attention. This was the same idea that I had in my black and white edited picture above.


very good work here, I do however think tat you need to add details on the camera settings used and how this affected the outcome, remember that the outdoor photographs should have been taken with a narrow depth of field, did you acheive this, how did you achieve it, what camera settings did you use.
ReplyDelete